Analysis Settings
Introduction
Section titled “Introduction”General Analysis Settings
Section titled “General Analysis Settings”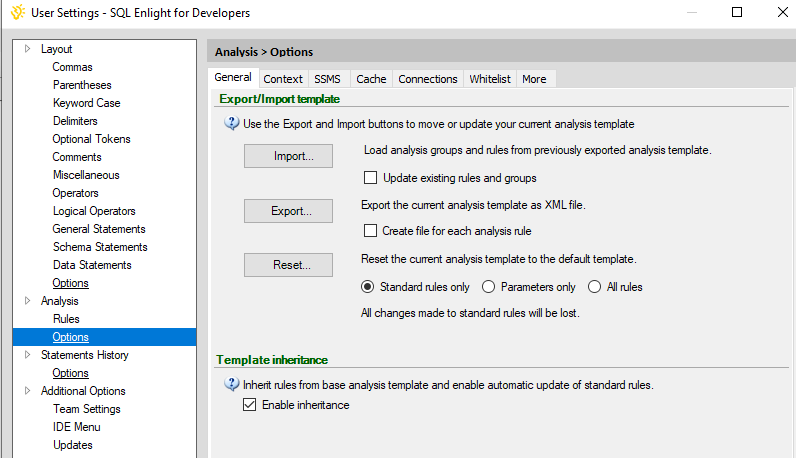
Analysis Template Import/Export
Section titled “Analysis Template Import/Export”Analysis template can be exported in an XML file and later imported on another machine or distributed between team members.
Using the following steps the analysis templates can be imported in SQL Enlight:
1.Download the latest analysis template from our website.
2.Start SQL Server Management Studioor Visual Studio, open SQL Enlight Options, and go to Settings-> Analysis Settingsitem
3.Create a backup of your existing template using the Exportbutton.
4.Choose how the template will be imported:
- Completely import and replace the active analysis template with the imported ones.
To use this option, unselect the Update existing rules and groupscheck box.
- Import all new rules and update existing rules from the new template, and preserve the rules in the active template that do not exist in the new template. This option is suitable for the case when you have custom rules (with names different than the ones in the new template) that you want to preserve.
To use this option, make sure that the Update existing rules and groupscheck box is selected.
5.Use the Import buttonto select the template file and import it in SQL Enlight.
Reset analysis template
Section titled “Reset analysis template”The Reset buttonunder the Export/Import section to reset the current analysis template to the default template.
There are three options for resetting the current template:
- Standard rules only - Any changes to the standard rules are reset, but the custom rules are not removed.
- Parameters only - only the parameters of the standard rules are reset to defaults.
- All rules - Any changes to the standard rules are reset and all custom rules are removed.
⚡ ** note: ** Create a backup of your existing template using, because all changes to the current template, any new rules or changes of existing rules will be lost.
Analysis template inheritance
Section titled “Analysis template inheritance”The setting enables or disables analysis base template inheritance.
Enabling inheritance allows standard rules from the base analysis template to be updated automatically with the latest version when a new version of SQL Enlight is installed.
Disabling the inheritance can be useful in case you would want to use only a set of custom analysis rules.
The recommended setting for the inheritance is enabled.
Analysis Context Settings
Section titled “Analysis Context Settings”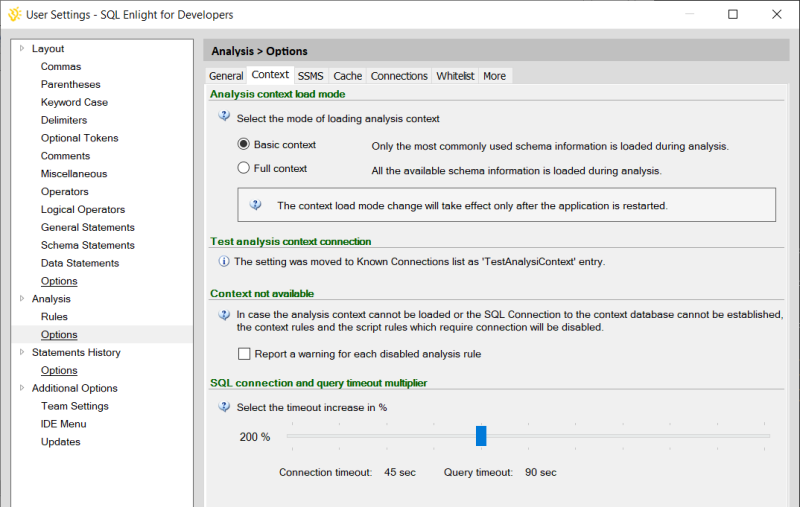
Analysis Context Mode
Section titled “Analysis Context Mode”Choose the detail level of the analysis context:
| Basic | Basic modewill load only the most commonly used schema information such as:* Server Information
- Principals, Role Members
- Schemas
- Data Types
- Assemblies
- Tables, Views, Triggers
- Functions, Partition Functions, Stored Procedures
- Rules, Defaults, Synonyms
- XML Schema Collections
- Indexes, Foreign Keys, Primary Keys, Check Constraints, Default Constraints
- FullText Catalogs, Data Spaces, File Groups
- Dependencies, Partition Schemes
- Statistics
| | Full | The Full modewill load all the basic schema information and also some additional database objects:* Message Types
- Service Contracts, Service Queues, Services, Service Bindings
- Routes
- SymmetricKeys
- AsymmetricKeys, Certificates
- Extended Properties, Event Notifications
|
Test Analysis Context Connection
Section titled “Test Analysis Context Connection”The Test Analysis Context Connection specifies the default connection to be used for testing analysis rules and generating analysis context in the Analysis Rule Designer.
⚡ ** note: ** The test connection string setting is now in the Known Connections list as ‘TestAnalysiContext’ entry.
Context not available warning
Section titled “Context not available warning”If the analysis context cannot be loaded or the SQL Connection to the context database cannot be established, the analysis rules which require context will be disabled.
The setting controls whether a warning is to be reported for each analysis rule that is disabled because of the missing analysis context.
Analysis context cache
Section titled “Analysis context cache”The setting specifies the location of the disk folder where database and server context information is stored. The disk cache is always enabled and is meant to speed up the loading of database context information.
The default folder is user’s application folder:
%APPDATA%\YubitSoft\SQL Enlight\ {version}\Cache\
The location can be changed in order to provide more or free disk space.
SQL connection and query timeout multiplier
Section titled “SQL connection and query timeout multiplier”This setting allows duration adjustment of these timeouts using a timeout multiplier. The default SQL connection timeout is 15 sec, and the default query execution timeout is 30 sec. Applying a multiplier can extend timeout periods significantly, ensuring smooth operations and avoiding potential timeout errors during the loading of analysis metadata.
SSMS Analysis Settings
Section titled “SSMS Analysis Settings”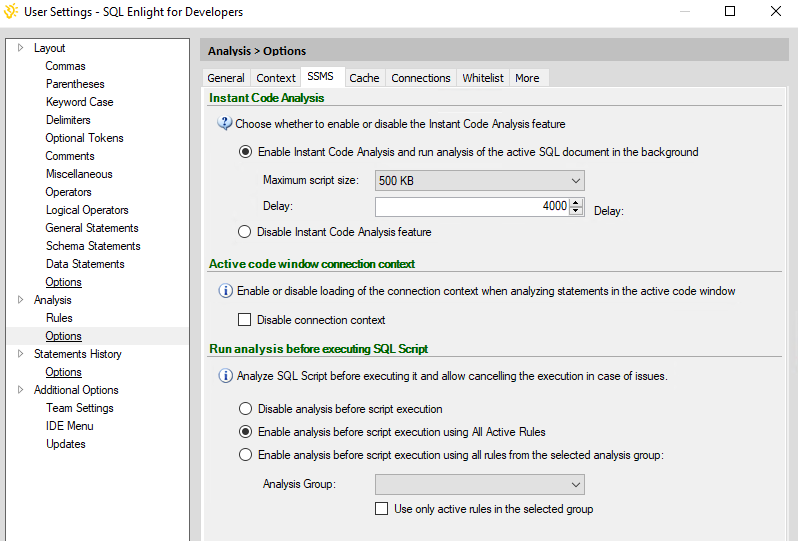
This settings tab contains SQL Server Management Studio specific integration related configuration options.
Instant Code Analysis
Section titled “Instant Code Analysis”Instant Code Analysis enables SQL documents to be analyzed in the background using the rules in the current analysis template.
The analysis will be triggered a couple of seconds after a script document is opened for the first time or an opened document has its content changed.
- Enable Instant Code Analysis
Enables background analysis.
- Maximum Script size
The Maximum script sizesetting controls the maximum analyzable by the Instant Code Analysis feature, document size.
Documents with content bigger than the specified limit will be ignored.
Available values: 100 KB, 200 KB, 500 KB, 5 MB, or Unlimited
- Delay
The Delaysetting specifies the wait between the last document change and the start of the code analysis. The default value of the delay is 4000 ms.
- Disable Instant Code Analysis
Disables background analysis.
Active code window connection context
Section titled “Active code window connection context”Enable or disable loading of the connection context when analyzing statements in the active code window.
When connection context is disabled, SQL Enlight does not attempt to load database context information and works without it. This setting will affect any context analysis rules and any rules which use the context information, but might speed up analysis in case only T-SQL script is analyzed or in case the database connection is not currently available.
The recommended setting for this option is not checked ( the connection context is enabled).
Run analysis before executing SQL code
Section titled “Run analysis before executing SQL code”The setting can be used to prevent executing SQL code that has any analysis issues. The set of rules, which are applied can be configured to either all active analysis rules or all rules from a specified analysis group.
Other Settings
Section titled “Other Settings”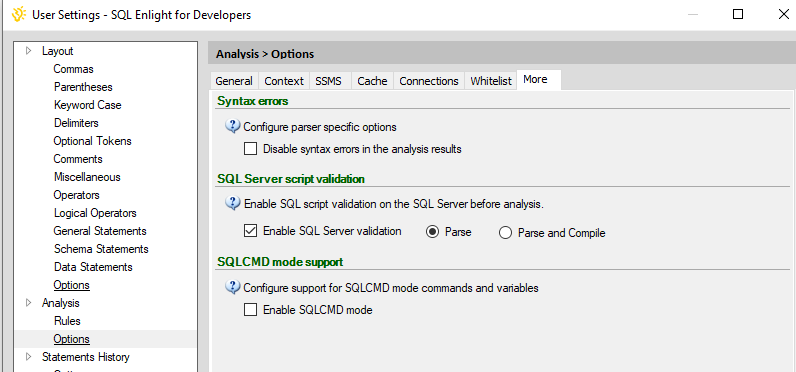
Syntax errors
Section titled “Syntax errors”The Disable syntax errors in analysis resultssetting control whether the syntax errors are reported in the analysis results or ignored.
SQL Server Script Validation Settings
Section titled “SQL Server Script Validation Settings”Enable SQL script to be validated by the connected SQL Server instance before doing analysis.
When the setting is enabled, there are two options which are available:
- Parse - The script is only parsed by the SQL Server and only syntax errors are reported.
- Parse and Compile - The script is parsed and compiled and syntax and schema errors are reported.
SQLCMD mode support
Section titled “SQLCMD mode support”Configure support for SQLCMD mode commands and variables. If enabled, the script is preprocessed and the SQLCMD variables are replaced before running code analysis.
Whitelist
Section titled “Whitelist”Analysis Whitelist - configure databases and objects, which are to be excluded from the analysis results.
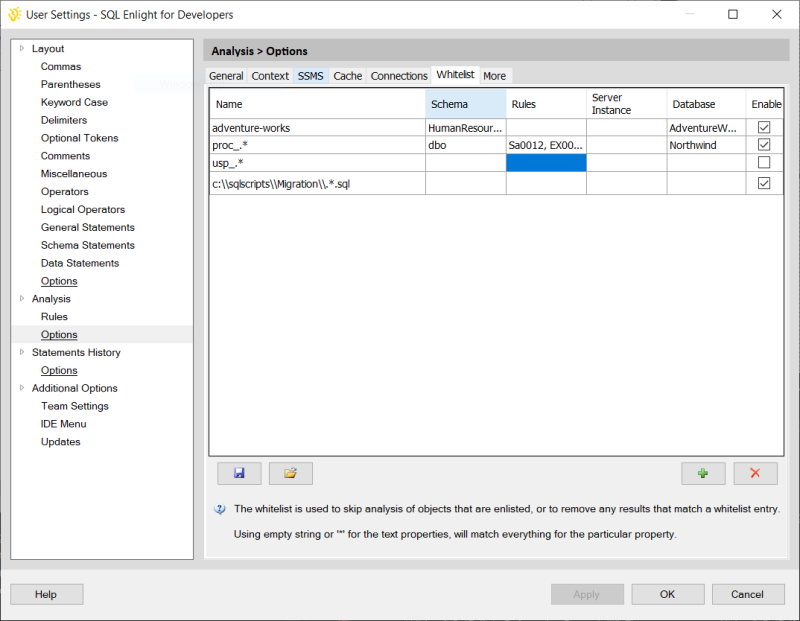
Using an empty string or a wildcard ‘*’ value of the text properties will match everything for that particular property.
Whitelist properties:
- Server Instance- a server instance that contains the white-listed object. Optional.
- Database- a database that contains the white-listed object. Optional.
- Schema- a database schema that contains the white-listed database object. Optional.
- Name- a valid regular expressionthat would match server and database objects(without schema name) as well as full or partial filenamesand paths. Required.
- Rules- a comma-separated list of analysis rules for which to remove their matched results. Optional.
- Enabled- a flag for enabling or disabling the whitelist entry. Only the enabled whitelist entries are considered.
The Name property can be any valid regular expression patternand is used to test whether a given object name is whitelisted or not. The other whitelist entry string properties ( Server, Database and Schema ) are compared as a case insensitive strings.
⚡ ** note: **
- When whitelisting files and paths, the Server Instance, Database and Schema properties have to be empty.
- The supported syntax for specifying inlining regular expression options is: (?imnsx-imnsx:subexpression)
Example whitelist table:
| Server Instance | Database | Schema | Name | Rules | Enabled | | ————— | —————— | ––––––– | ———————————————–– | –––––––––– | —–– | –– | | | AdventureWorks2022 | | Emp.* | | true | | SqlSrv1\sql2019 | AdventureWorks2019 | HumanResources | ^(Emp | proc_).* | | true | | * | Northwind | dbo | ^A.*$ | SA0078,Naming | false | | | | | \my_scrpts_forlder\stored_procedures\Orders.* | Design,Naming,EX0018 | true | | | | | \db-migration-scripts\.*.sql$ | | true | | | | | (?-i:\db-migration-scripts\.*.sql)$ | | true |
Example whitelist file:
<?xml version="1.0" encoding="utf-8"?><Whitelist xmlns:xsd="http://www.w3.org/2001/XMLSchema" xmlns:xsi="http://www.w3.org/2001/XMLSchema-instance"> <Entry Server="" Database="AdventureWorks2022" Schema="" ObjectName="Emp.*" TargetRules="" Enabled="true" /> <Entry Server="SqlSrv1\sql2019" Database="AdventureWorks2019" Schema="HumanResources" ObjectName="^(Emp|proc_).*" TargetRules="" Enabled="true" /> <Entry Server="*" Database="Northwind" Schema="dbo" ObjectName="^A.*$" TargetRules="SA0078,Naming" Enabled="false" /> <Entry Server="" Database="" Schema="" ObjectName="\\my_scrpts_forlder\\stored_procedures\\Orders.*" TargetRules="Design,Naming,EX0018" Enabled="false" /> <Entry Server="" Database="" Schema="" ObjectName="\\ef-migration-scripts\\.*.sql$" TargetRules="" Enabled="true" /></Whitelist>Known Connections
Section titled “Known Connections”The Known Connections stores a list of connection strings for commonly used databases. These connection strings will be used by SQL Enlight for loading the database’s metadata instead of the active connection from the IDE.
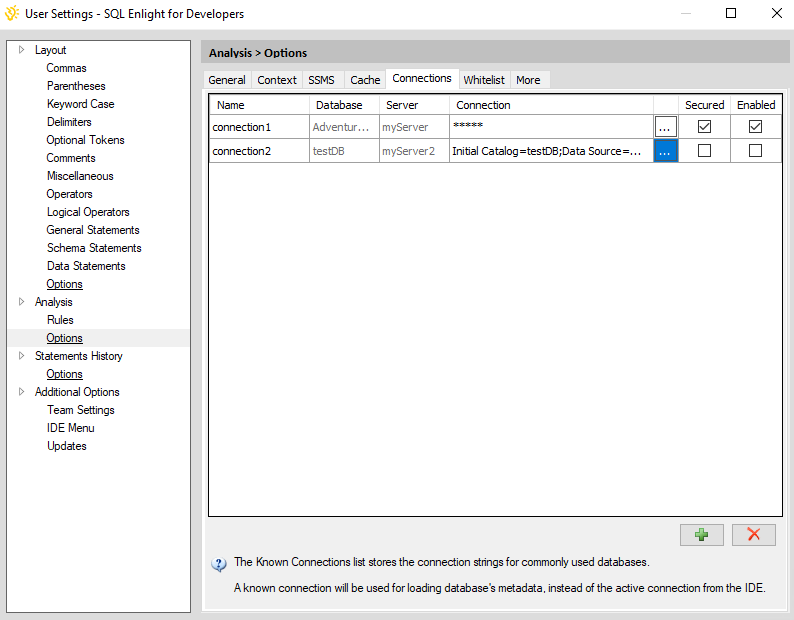
The main use case for this setting is to make SQL Enlight use different connection settings when loading database metadata. For example, when the user connects to a database from SSMS with an account having limited SQL Server privileges, but to be able to load all the metadata because SQL Enlight needs administrator privileges, a new connection string with SQL Authentication and administrator user can be configured for the particular database.
Properties:
- Name- the informational name of the connection.
- Database- the target database. The field is readonly and is retrieved from the connection string.
- Server- the target server instance. The field is readonly and is retrieved from the connection string.
- Connection String- The connection string. The field is shown only when it is not secured.
- Secured- When the field is secured, it is stored encrypted in the SQL Enlight settings and cannot be edited after it is saved.
- Enabled- Enable or disable the current entry.
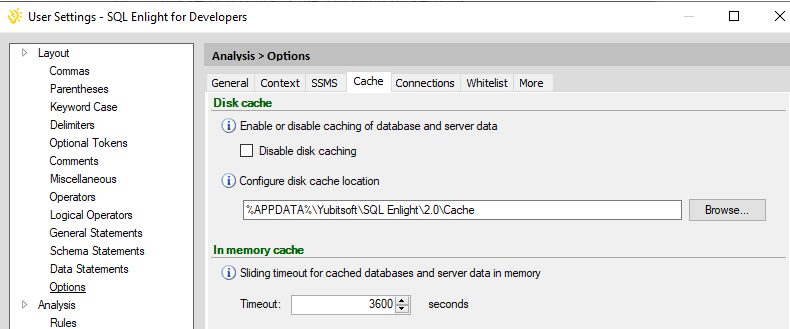
Disk cache
Section titled “Disk cache”The setting specifies the location of the disk folder where database and server context information is stored. The disk cache is always enabled and is meant to speed up the loading of database context information.
The default folder is user’s application folder:
%APPDATA%\YubitSoft\SQL Enlight\ {version}\Cache\
The location can be changed in order to provide more or free disk space.
In-memory cache
Section titled “In-memory cache”The setting configures the sliding timeout for in-memory cached server and database data.
Quality Gate
Section titled “Quality Gate”You can access the Quality Gate settings from the SQL Enlight user settings:
User Settings→ Analysis→ Options→ Quality Gate
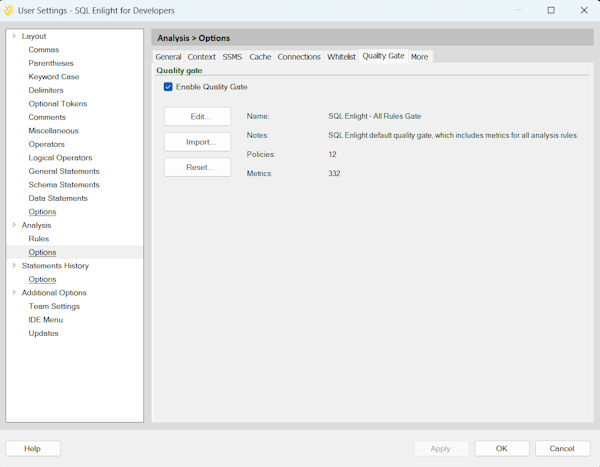 Quality Gate options page in the Analysis > Options dialog.
On this page you can:
-
Enable or disable the Quality Gate.
-
View the currently active Quality Gate definition.
-
Edit, import, or reset the Quality Gate definition.
-
See the number of defined metrics and policies.
Import, Export, and Reset
Section titled “Import, Export, and Reset”The Quality Gate editor provides the following commands at the bottom of the dialog:
-
Export…- Save the current Quality Gate definition to a file (for example, JSON).
-
Import…- Load a Quality Gate definition from a file.
-
Reset- Restore the SQL Enlight default gate configuration.
Import and export operations make it easy to share Quality Gate definitions between developers, teams, or build environments and to version them under source control.
Editing a Quality Gate Definition
Section titled “Editing a Quality Gate Definition”Click the Edit…button on the Quality Gate options page to open the main Quality Gate editor dialog.
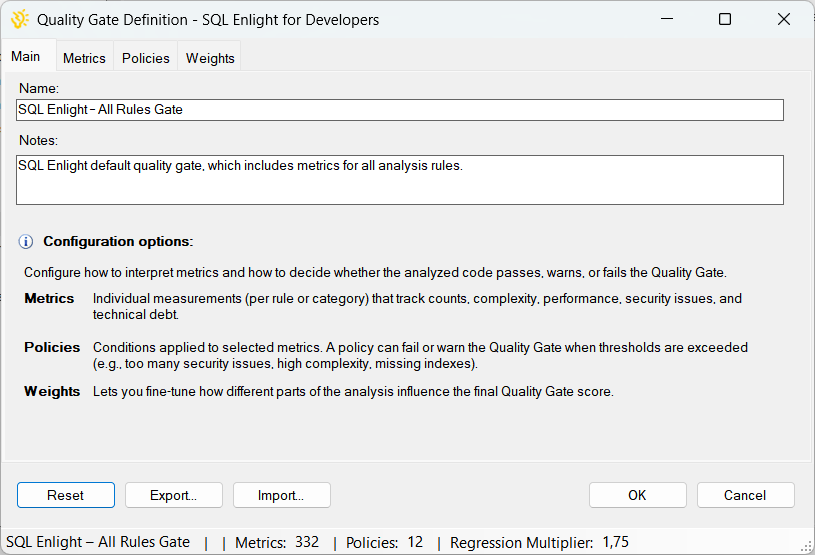 Main Quality Gate editor dialog.
The editor contains four primary tabs:
1.Main- General name, notes, and overview help text.
2.Metrics- List and configuration of all metric definitions.
3.Policies- Fail/Warn rules that apply to individual or grouped metrics.
4.Weights- Category weights and severity overrides that influence scoring.
Main Tab
Section titled “Main Tab”The Maintab shows the Quality Gate’s basic identity and a short explanation of its building blocks.
The following fields are available:
-
Name- A human-readable identifier for the Quality Gate (for example, “SQL Enlight - All Rules Gate”).
-
Notes- Optional free-form text describing the intent or scope of this gate.
The Main tab also displays short descriptions of:
-
Metrics- Individual measurements (usually per analysis rule) that the Quality Gate will evaluate.
-
Policies- Conditions applied to metrics that decide when the Quality Gate warns or fails.
-
Weights- Category and severity weights that influence the overall score.
Use the Main tab to document the purpose of the gate and provide a quick explanation for team members who import or reuse the definition.
Metrics Tab
Section titled “Metrics Tab”The Metricstab lists all metric definitions that the Quality Gate uses. Typically, there is one metric per SQL Enlight analysis rule, plus optional synthetic metrics such as technical debt or complexity measures.
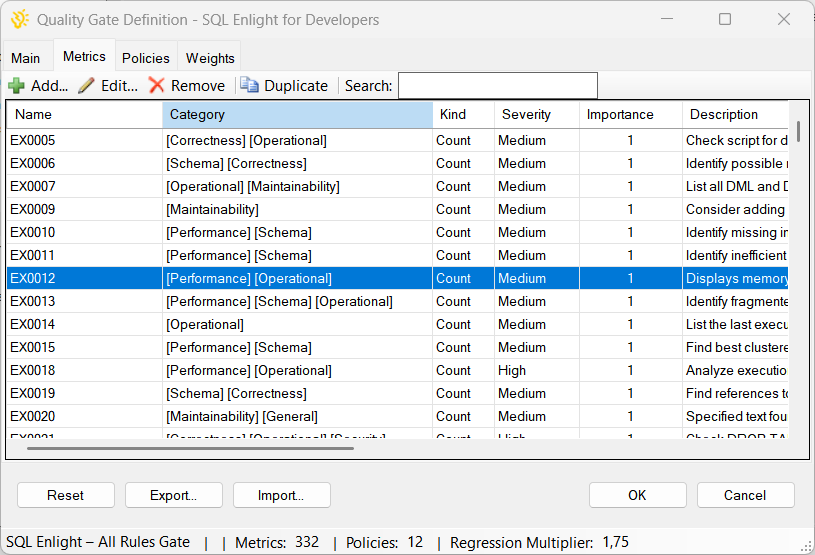 Metrics tab showing the list of metric definitions.
From this tab you can:
-
Add new metrics.
-
Edit existing metrics.
-
Remove metrics from the Quality Gate definition.
-
Duplicate metrics as a starting point for similar configurations.
-
Search for a metric by ID, name, or description.
Double-click a metric or choose Edit…to open the metric editor dialog.
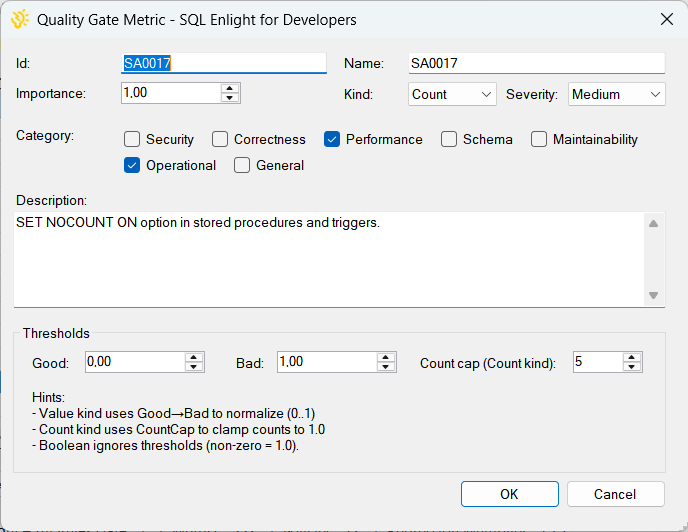 Metric editor dialog.
The metric editor contains the following fields:
-
Idand Name- Identifier and display name, typically derived from the SQL Enlight rule ID (for example, SA0017).
-
Importance- An importance factor used when computing penalties and scores. Higher values increase the effect of this metric.
-
Kind- Indicates whether the metric is a Count, Value, or Booleantype. Threshold interpretation depends on this kind.
-
Severity- Logical severity of this metric (Critical, High, Medium, or Low).
-
Category- One or more categories (Security, Correctness, Performance, Schema, Maintainability, Operational, General). Categories are used later for category scoring and policy configuration.
-
Description- A human-readable explanation of what the metric represents.
-
Thresholds- Good, Bad, and Count Cap settings that control how raw values are normalized to a 0..1 score.
The hints shown in the dialog explain how the Quality Gate uses the thresholds:
-
Value kinduses Good → Bad to normalize into the [0,1] range.
-
Count kinduses Count Cap to clamp counts to 1.0.
-
Boolean kindignores thresholds and treats non-zero as 1.0.
Policies Tab
Section titled “Policies Tab”Policies define whenthe Quality Gate should issue a warning or fail based on the aggregated values of selected metrics.
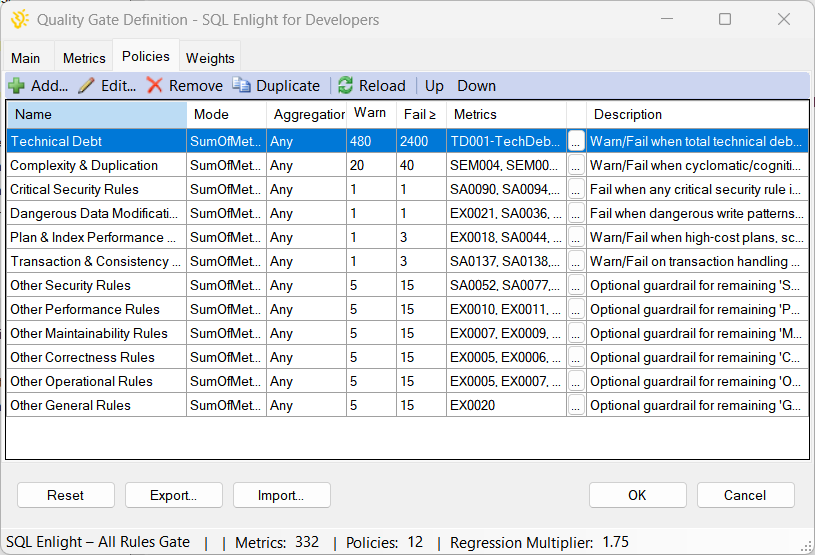 Policies tab showing the list of policies.
A policy typically has the following properties:
-
Name- A descriptive name such as “Technical Debt” or “Critical Security Rules”.
-
Mode- How the policy aggregates metric values (for example, SumOfMetricValues, Average, Max, Min, or violated metric count).
-
Aggregation- Whether the policy uses Anyor Allsemantics when evaluating the metric set.
-
Warnthreshold - The score at or above which the policy raises a warning.
-
Failthreshold - The score at or above which the policy fails the Quality Gate.
-
Metric Ids- The metrics that this policy evaluates. These can be left as “(none)” for category-only policies or explicitly specified for rule-set policies.
-
Description- A short explanation of what the policy is guarding against.
Double-click a policy or choose Edit…to open the policy editor dialog.
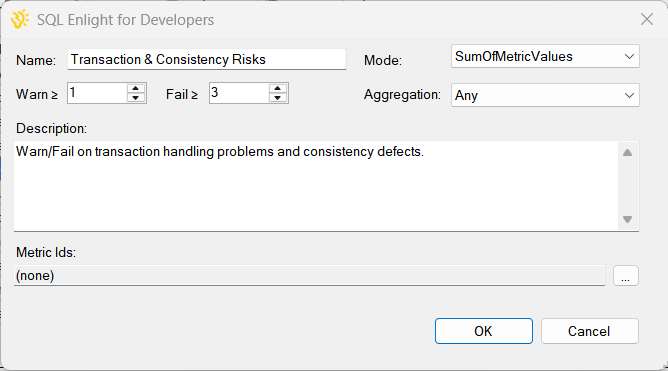 Policy editor dialog.
In the policy editor you can configure the mode, aggregation behavior, thresholds, and the set of metrics that participate in the policy. This allows high-level rules, such as:
-
Fail when the sum of complexity and duplication metrics exceeds a limit.
-
Fail when any critical security rule shows violations.
-
Warn when technical debt grows beyond a specified budget.
Weights Tab
Section titled “Weights Tab”The Weightstab controls how much each metric category and each severity level influences the overall Quality Gate score.
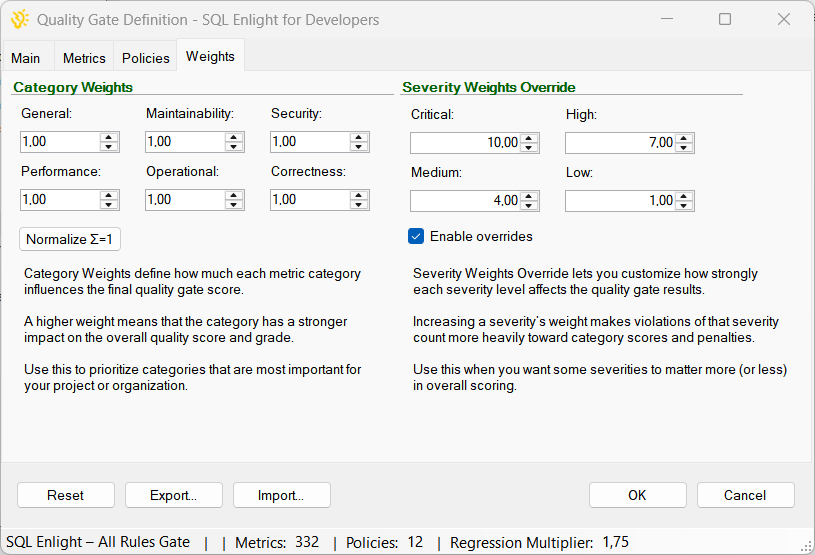 Weights tab showing category weights and severity overrides.
The tab is split into two sections:
Category Weights
Section titled “Category Weights”Category weights determine how strongly each category contributes to the overall gate score. For example, you can assign higher weight to the Securitycategory if you want security issues to affect the score more than other categories.
A higher weight means the category has a stronger influence on the final quality grade; a lower weight reduces its impact.
Severity Weights Override
Section titled “Severity Weights Override”Severity weight overrides let you redefine how much each severity level contributes to penalties and scoring. If overrides are enabled, the specified values replace the default severity weights.
For example, you might assign:
-
Critical: 10.0
-
High: 7.0
-
Medium: 4.0
-
Low: 1.0
Increasing a severity’s weight makes violations of that severity count more heavily toward the overall score. Decreasing the weight reduces the impact of that severity level.